Upgrading SpamFilter ISP to Enterprise
Printed From: LogSat Software
Category: Spam Filter ISP
Forum Name: Spam Filter ISP Support
Forum Description: General support for Spam Filter ISP
URL: https://www.logsat.com/spamfilter/forums/forum_posts.asp?TID=6162
Printed Date: 26 March 2026 at 5:52am
Topic: Upgrading SpamFilter ISP to Enterprise
Posted By: LogSat
Subject: Upgrading SpamFilter ISP to Enterprise
Date Posted: 25 July 2007 at 10:15pm
|
When SpamFilter's operating mode is switched from "SpamFilter ISP
"Standard" to "SpamFilter Enterprise" and SpamFilter Enterprise is
restarted, the initial filter settings will assume default values. Any existing "Standard" settings will need to be re-imported into SpamFilter Enterprise using the "Copy file-based settings" button as shown in the screenshot below. http://www.logsat.com/images/Settings-Upgrade-SFI-SFE.png">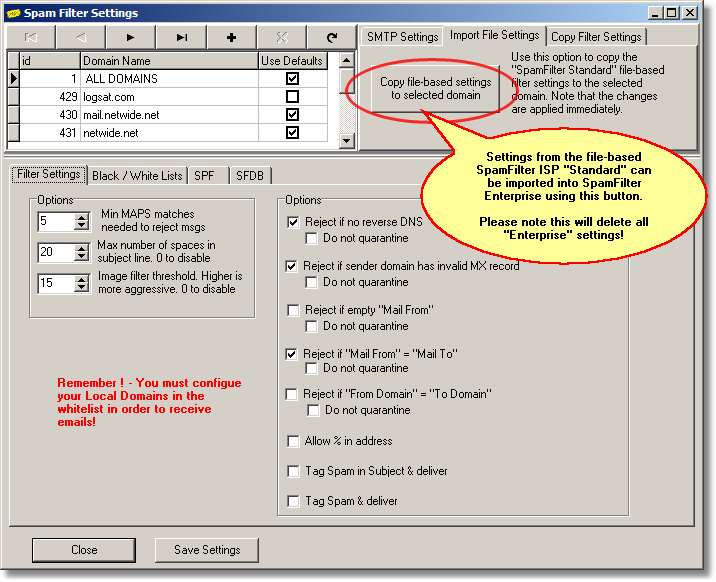 Upgrading to SpamFilter Enteprise "offline" Administrators managing installations with several domains and/or complex filters may want to configure and test the upgrade from SpamFilter ISP to SpamFilter Enterprise before proceeding with the upgrade. The following section describes a methodology that can be used to configure your SpamFilter Enterprise settings before actually performing the upgrade, keeping your current SpamFilter ISP running at all times, thereby eliminating any downtime. SpamFilter Enterprise (SFE) was designed to share the same database used by SpamFilter ISP "Standard" (SFI). Furthermore, the "Enterprise" (SFE) tables are completely independent from the "Standard" (SFI) tables. This allows administrators to configure all the "Enterprise" settings without interfering with the "Standard" settings. This means that, for example, you run a second instance of SpamFilter "standard", and perform the upgrade on this second instance, leaving your live production instance "as-is". Upgrading the second instance will create all the SFE-related tables in the live production database, but the two will not interfere with each other. You can then proceed to configure and test all your SFE settings without impacting your "live" SpamFilter installation. After your SFE configuration is completed and are satisfied with its testing, the database will contain the correct settings that SFE will use. At this point, when you're ready, you can proceed to change the operating mode of your "live" copy of SFI to SFE, and restart SpamFilter. Your "live" SpamFilter will now immediately work by reading the SFE tables that you've already configured, and your upgrade downtime will be limited to the few seconds it takes to stop and restart SpamFilter's service. To proceed this way, you will then have to configure a second instance of SpamFilter. Since SpamFilter was developed so that all files reside in the installation directory, its configurations files are stored in text files, and no settings are stored in Windows' registry, this process is rather simple. We suggest to copy your entire SpamFilter installation directory to a different location on your server. You do not need to stop SpamFilter during the copy process, as the only files that can be locked are possibly some temp files used to spool emails. You may want to exclude the "SpamFilter\logfiles" and the "SpamFilter\queue" directory from the copy process to save some time and avoid file sharing warnings. In the sample below, we'll assume your "live" SpamFilter installation directory is: c:\program files\SpamFilter and that you will be installing your second temporary instance to: c:\program files\SpamFilterEnterprise After copying the directory, you will need to edit the only two configuration files and update any directory path they may contain. These two files are: c:\program files\SpamFilterEnterprise\SpamFilter.ini c:\program files\SpamFilterEnterprise\Domains\SFI\Filters.ini (this file may not exist if you have not upgrade to SpamFilter v3.5 yet). In the SpamFilter.ini file, look for the line: ListenPort=25 This is used to tell SpamFilter on which port to listen for incoming SMTP traffic. You will need to change it so your second instance won't interfere with your live one. Assuming your server is not using port 26, please change the entry above to something like (you can choose a different port if you wish): ListenPort=26 After changing the port number, while not strictly necessary, as a precaution you may want to update the SpamFilter.ini and the Filters.ini files above so that they point to the blacklist/whitelist files in your new directory, not to those in your live directory. To do this, simply do a "search and replace" for all text in your SpamFilter.ini and Filters.ini files, looking for the string "c:\program files\SpamFilter\" and replace it with "c:\program files\SpamFilterEnterprise\" (note the trailing "\"). Your second instance of SpamFilter is now configured exactly like your first one. You can now double-click on the "c:\program files\SpamFilterEnterprise\SpamFilter.exe" executable to start your second instance of SpamFilter. Please make sure there are no errors being displayed in the "Activity Log" tab upon startup, and if so, you may continue. To upgrade this second instance to SpamFilter all you need to do is to:
------------- Roberto Franceschetti http://www.logsat.com" rel="nofollow - LogSat Software http://www.logsat.com/sfi-spam-filter.asp" rel="nofollow - Spam Filter ISP |
Replies:
Posted By: atifghaffar
Date Posted: 02 August 2007 at 8:26pm
|
Roberto, Is is feasable to move to SFE without using local domains. I recently changed our SFI settings to use "*" in AllowedDomains and then reject everything that is not in the AuthorizedRecipients.txt This way, I dont have to care about managing AllowedDomainFilterMatrix.txt and AllowedDomains.txt any more. Is this doable also with SFE. The only thing that I will gain then would be that only an update of the authorizedrecipients will be needed instead of creating the file and scp'ing it to the servers. PS: looking at tblwl_authorizedtoemails, it seems like domain_id and login_id is not mandatory. What about the email field. Can it contain full email address as "atif.ghaffar@somedomain.tld" or just the localpart "atif.ghaffar"? ------------- best regards Atif |
Posted By: LogSat
Date Posted: 03 August 2007 at 4:17pm
|
We never thought about using the combination wildcard / AuthorizedTO as you described it! I guess we ourselves never stop learning about SpamFilter either... That is actually a brilliant idea, and yes, it will work in SpamFilter Enterprise as well. Simply add a new domain called "*" in the tbl_LocalDomains, and let it use the default settings. For the authorizedtoemails (and all other SFE-related tables), the domain_id fields are indeed required by SpamFilter (even thought we do allow nulls for it in the database). The login_id is reserved for future use and is not required. ------------- Roberto Franceschetti http://www.logsat.com" rel="nofollow - LogSat Software http://www.logsat.com/sfi-spam-filter.asp" rel="nofollow - Spam Filter ISP |
Posted By: ed.kalk
Date Posted: 20 June 2008 at 12:23pm
| What is the difference between the two versions? |
Posted By: LogSat
Date Posted: 20 June 2008 at 7:02pm
|
Please see http://www.logsat.com/sfi-spam-filter-feature-comparison.asp - www.logsat.com/sfi-spam-filter-feature-comparison.asp
------------- Roberto Franceschetti http://www.logsat.com" rel="nofollow - LogSat Software http://www.logsat.com/sfi-spam-filter.asp" rel="nofollow - Spam Filter ISP |